
|

© Copyright Hassenfeld Bros., Inc., Pawtucket, R.I. |

|
|
|
|
© Copyright Hassenfeld Bros., Inc., Pawtucket, R.I. |
|
|
|
|
|
|
|
|
|
|
|
|
|
|
|
|
|
|

|
|
|
STEP 2. Let's begin this fix by getting a pair of needle nose pliers. Use the needle nose pliers to grab the side of the inner liner wedging them in between the inside of the helmet and the outside of the liner. With a very firm grasp on the liner, begin to twist it back and fourth in an attempt to loosen it up. This may require working it around a bit. Repeat this procedure on the other side and as many times as necessary until the liner is quite loose. Be careful not to damage the helmet while doing this. Now hold the helmet in one hand with a firm grasp. Grab the liner with the pliers again and give it a good pull away from the helmet. The liner should come out quite easily. |
|

|
STEP 3. Now use needle nose pliers or larger to break off the four small pegs that are left behind which held the inner liner to the helmet. Grab the first peg firmly with the pliers as close to the base of the peg as possible. Wiggle and twist the peg until the plastic fatigues and breaks (hopefully at the base of the peg or close enough to the inside helmet surface). Do a test fit on an action figure head. If you need to remove more of the peg, do so at this time. Repeat the procedure with any remaining pegs. The helmet should fit quite well once completed. This produces a helmet that fits most 12" action figure heads. |
|
|
| Removing Velcro | |
|
BEGIN. Take a look at this Soldiers of the World jacket and pants before the process of removing the Velcro begins. This is actually a pretty nice 4-pocket jacket with a color airborne patch and 48-star U.S. flag on each shoulder. It's amazing how much nicer these will look once the Velcro is removed. |

|
STEP 1. The scissors for this work must be very small with narrow edges so as to easily slip under the Velcro between the seams. Using the scissors, cut up the center of the Velcro between the two stitched seams. Then cut one or two of the woven strands of plastic making up the Velcro. Don't cut the whole length. Cut just enough to grab with the needle nose pliers. |

|
STEP 2. Using the pliers, firmly grab one of the woven strands just cut. Pull it up the remainder of the strand (like peeling a banana) until it falls off. Continue this procedure with subsequent strands. It's like removing each woven strand in a basket. Eventually, the piece of Velcro will begin to fall apart as the strands are removed. The process may require occasionally removing some of the perpendicular strands crossing these. |
Eventually, if careful, all Velcro can be removed from the stitching without destroying the stitching. Repeat this procedure with all of the Velcro on the jacket, pants, and even the belts and backpacks. The trousers are not nearly as important because the fly is on the back of the figure. One can turn them around, but the pockets won't be positioned correctly. The hanging jacket will cover up the fly anyway. This is a time consuming and tedious process so BE PATIENT! |

|

|
|||
| Adding Metal Snaps | |
|
BEGIN. I usually sewed metal snaps on all the earlier Soldiers of the World clothing items, backpacks and even some of the cloth belts if they were worth keeping. This also applies to any items made by other manufacturers. Sewing or craft stores sell the small metal snaps. I've seen them available in black or silver. I usually sew three snaps on each jacket. Three seems to be just enough to keep the jacket closed and for it to lay properly. Choose an appropriate color thread that matches the uniform color. Remember that unless buttons are being used, the color of the thread will show a bit on the outside of the uniform jacket and pants. Even if using buttons, an off color thread will be pretty obvious. |

|
|
STEP 1. Let's begin by placing the female portions of the snaps on the inside of the jacket. Start at the bottom of the jacket about 1/2" to 3/4" from the bottom. Place the first half of the snap against the right side of the jacket fabric and begin securing it with needle and thread. Stitch through each of the snap's four holes. Don't stitch too much or the thread will not allow the male portion of the snap to securely engage the first. The stitches will not show since they face the inside of the jacket against the figure. |

|
STEP 2. Now, evenly space the remaining two snaps up the jacket. Just make sure the top snap is not all the way to the top of the collar unless that is the desired result. It sometimes looks better when it's located just down from the very top so a T-shirt or dickie is visable under the jacket. Sew the second (or middle) snap using the same procedures as STEP 1. Now sew the third (top) snap. |
|
STEP 3. Now to sew the corresponding male portions of the snaps. The first one is the easiest. This is the one for the bottom snap. Measure carefully so when the two are mated together, the bottom edges of the jacket match. Avoid getting one edge to be lower than the other. When sewing the male snaps, remember that these are against the inside fabric of the left side of the jacket. Therefore, any stitching will show on the outside of the jacket. |
|

|
HERE IS A HINT...Start the stitch from the inside of the
jacket pushing the needle towards the outside. Then go back through
the fabric to the inside of the jacket by putting the needle through
almost the same hole. Be careful because SOTW clothes have a wide fabric
and it's easy to remove the stitch if pulled too hard. Once on the inside
of the jacket again, the needle and thread can go over the snap to the next
hole. Again, secure all four holes of the snap. If done carefully and with
planning, very little of the stitching will show on the outside of the
fabric and it will be secure enough to be handles quite often.
NOTE: If putting buttons on the jacket, the appearance of the
stitching on the outside of the jacket won't matter.
|
|
When the snaps are connected together there should be no obvious
gathering or pulls in the fabric. If there is, that means that one
or more of the snaps on one side of the jacket are not in the right
position - probably those on the left side since those were done last.
Remove the required snap using a seam ripper, carefully re-measure its
location and sew it on again. Check the alignment by snapping
everything together again.
STEP 4. Eventually, when all the sewing and repositioning
is completed, the outside of the jacket should look like this. Use
the same method with the trousers. Rip out the Velcro. Add one or
two snaps (I usually use one) and...viola. That horrible Velcro is gone and
replaced it with some sharp looking snaps.
|
|
Upgrade Older SOTW Weapons
|
||||
|
|

|
|||

|
|
|||
|
STEP 3. Measure and cut a length of strapping. The leather can be glued using fabric glue. Put the strap through the first ring and secure it using glue or sew it. If using elastic, place a small amount of glue on the strap and wait a couple of minutes for it to get tacky. Then bend over the strap against the glue. Secure it using a small amount of thread. If the strap is leather, use the same procedure except for sewing. |

|
|||
|
STEP 4. Take the other end of the strap and run it down through the second ring. Pull it through and bring it about half way the length of the strap before cutting. Glue and/or sew this end in the same way as the first end. Notice that the fold over point of the strap in the ring should not show on the outside of the strap. It should be facing the inside of the strap. |
||||
|
FINISH. When completed, the weapon with its new strap should look like this. It's a nice addition to an older Soldiers of the World weapon and well worth the small amount of time required for the upgrade. If nothing else, at least it can be slung over a soldier's shoulder. Again, these techniques apply to all manufacturers. I used a similar process on Hasbro's older plastic M-16s that came with the first carded figures, but also had to unclude mounting rings. |

|
|||

|
Beware of different types of plastics in combination with one another. If you value your Joe items, make sure you keep items made from polyvinyl (soft plastics) and styrene (hard plastics) separated. Placing these items in contact with one another for any prolonged length of time will result in a chemical reaction leaving you with those famous melt marks. Store all your boots in one bag or container. Don’t mix weapons or helmets with boots. I keep all my 21st Century weapons together. Same thing with the Hasbro weapons. |
|
There are some very nice uniforms out there that can sometimes be used for other purposes. In order to do this, however, those decals must sometimes come off. This method is not foolproof, but has worked for some collectors. First remember to take the uniform piece OFF the action figure. Use a non-acetate nail polish remover to take off the decal. Take a Q-tip and dip it in the remover. Apply it to the INSIDE of the uniform piece directly under the decal so that it loosens the glue itself. Applying it to outside (top) of the decal may just melt it and ruin the uniform. The patch should almost immediately loosen so you can pull it from the uniform using tweezers. This may also allow you to use the patch for other uniforms in the future. Allow the uniform piece to air dry before placing it back on a figure. Please note that this probably will NOT work when attempting to remove decals from vinyl (like many of those pilot jackets). |
|
There are several methods to clean certain GI Joe clothes such as white
cadet pants, ski patrol outfits and other whites. These methods
include using products such as Softscrub, OXI Clean, Polydent, and
Efferdent. All of these cleaning methods have been attempted by
various GI Joe collectors. I have not tried them all myself, but those
who have tried them, have been satisfied with the results.
Cleaning With Softscrub & Efferdent:
Use a large container (like a large tupperware container) to soak the piece. Wet the item and place in the container. Shake the Softscrub and apply it to the entire item. Using a toothpick may work best. Wait about five minutes and then add warm water to the container until it covers the uniform by about and inch. Apply more Softscrub and let it soak about 20-30 minutes. Be careful not to keep it in longer than this. Remove the piece and rinse it well under warm water. Rinse the container well and fill with about 1 1/2 inches of warm water. Drop two or three Efferdent tablets in the container and place the piece flat in the container. Let the Efferdent work. Allow the piece to remain in this for about three hours. Don't be concerned if the piece begins to look blue. The blue will disappear after a couple of hours in the bath. This process is removing the chlorine from the bleach. The baking soda in the Efferdent should brighten the whites. All of the chlorine must be removed or it will eventually yellow the piece. This is why using straight bleach isn't a good idea unless you use Efferdent following the treatment. Remove the piece and rinse. If it still isn't white or bright enough, try the Efferdent bath again. Follow this by rinsing well. You must remove all of the excess water from the piece. I have heard of some people using a salad spinner to do this (similar to the spin cycle on your washer). Dry flat.
Cleaning With Polydent:
Cleaning With OXI Clean:
OXI Clean has also been reported to take the stains out of some
colored clothes with no ill effects of loss of color. I don't know
if this is the standard or the rule, but it has worked fine in some
cases. If the item is lost anyway, you have nothing to lose.
Only one tip here - Make sure to wash the item off with some tap water
after the treatment. Otherwise, the leftover cleaner may crystallize
on the clothes.
Cleaning colored uniform pieces, etc:
Some Hasbro uniforms should never touch water unless absolutely
necessary due to the unstable dye lots used in their manufacture.
Some of these items will have dyes that always run and bleed. Some
specific items are the Green Airborne MP, Marine Jungle Fighter,
Dress Marine, Shore Patrol, and Cadet tunics. It maybe be best to
only use the tape, sweater shaver, and steam method for these.
Steam Pressing:
|
|
|
ATTACK OF THE MOLD
Here are the procedures to solve this problem: 2. Open the set and inspect it. If you don't see any problem, insert the bottom of the box in the top and leave your set open in a regular room so that ultraviolet light will fall on your set. 3. If you do see this problem, blow the mold off with compressed air. Set them in the sun for a day or two to kill anything else. 4. DO NOT put the box in the sun as it will warp thereby ruining your box. The black board absorbs too much sun light. 5. Make a solution of half peroxide and water. Put just enough on a towel to make it damp and wipe out your box. 6. Let the box dry and then put your figures back in. 7. Add new moisture packets in the box as the old ones are probably useless. Please note that the items in the sealed bags in the center of the box do not seem to be affected. If you have any problems at all, please let the Club know and they will help you in any way they can. Call 817-448-9863. |
|
|
|
I obviously cannot open every figure I buy nor would my wife let me, I'm sure. I purchase some figures with no intention of opening them mainly because I like the total look of the figure and artwork/box design. So naturally, I have to store them somewhere. I use the 66 quart clear plastic containers made by a company called Sterilite (Sterilite ClearView Storage Box). You can find these in the household section of Target and many other similar type retail stores. These containers are storeable and stackable plus you can see through the sides. The cost is usually reasonable at approximately $5 or $6 each. If you wait for a sale, these can be a bit cheaper. Why store Joe items in containers? Stacking the figures on top of each other is too unstable and slowly damages the figures and/or the packaging. The containers stack on one another very easily are are very stable even with a stack of 7 or 8 high. Why 66 quart? No reason. They seem to be the right size both for storage of the figures and for storage of the containers themselves throughout the house. There are larger containers, but I find they aren't so easily stored throughout my house. The 66 quart container will fit about 5 or 6 boxed figures side ways plus another one or two figures or mission gear sets on top depending on width. |
|
To control moisture, it's best to keep the containers in a location free of hot and cold (damp) temperatures. Moisture can be controlled using desiccant packages, but must be recharged or replaced. Some have said drilling holes in the sides keeps moisture from building up inside. I store the containers in several places in my home. I store some containers in my basement (it's a finished basement). Some are in closets throughout the house. I have never stored them in my garage, attic, or any utility type shed that is exposed to extreme variations in heat and cold. Much to my wife's regret, all the containers are in my home and not in outside sheds or storage. Another thing I do is mark each container with a number, like GI 01. I keep a huge inventory of everything I have for insurance and other reasons. Every figure or item in a container has a corresponding container number assigned to it in my main database so I know where to find the figure. Also, each container number has a location in the database, like in a specific closet or under the stairs, etc so I know where to find the container. I also have a mini database of container numbers and the items in each container along with the item number of each piece. |
|
|
Until recently, custom painting cheap plastic or blow molded type 1:6 scale action figure vehicles was difficult as the paint would react with the plastic, blistering, flaking and cracking. In 2003, Krylon invented a special brand spraypaint called "Fusion" which was specially designed for painting soft plastics. Fusion superbond spraypaint bonds to plastic without cracking or peeling, dries in approximately 15 minutes or less, requires no sanding or priming, and can be used on ALL plastics, inside and out. Fusion comes in several colors including yellow, perfect for Adventure Team vehicles. DO NOT PRIME before using Fusion or paint with non-Fusion paint over the top of a Fusion coat. If you do, it will crack. Temperature and humidity are VERY important when using Fusion. Read the temperature requirements (paint on a dry, warm day for best results) and allow sufficient "SET UP" time as recommended on the label so the paint can cure and harden completely before you handle the painted item or reassemble painted pieces. Before painting, wash and dry the item. Ensure there is no foreign substance on the item like fuzz, hair, or spots because once it's painted, it's done. It's not possible to sand after painting. If there are logos on the item that will not come off before painting, cover the logo(s) with 2-3 coats of Fusion, allowing the paint to dry between applications. Then spray paint the remainder of the vehicle. That should cover the logo. |
|
|
It's not uncommon from time to time to come across a GI Joe action figure that has some weird stain. I came across just such a figure. On the figure's chin was this huge medium blue stain, which appeared to be from a magic marker or some other such ink. After doing some research and asking the advice of some fellow collectos, I was referred to a product called Remove-Zit. Remove-Zit is a great stain removal product manufactured by Twin Pines of Maine, Inc. This is a specific stain remover for dolls and action figures. The cost is $9.95 plus shipping. Look for the company on the internet. The photos below show the stain removal job I faced and the end results, which were very favorable. The process started by using a toothpick to apply an amount of the stain removal on the chin of the figure. It's best to leave the product on the figure for a couple of days before removing. It may require multiple applications before the stain is entirely removed (as it did in my case). The stain in the first photo is after one application of Remove-Zit. It was actually much worse to start with. Don't be discouraged after one applicatioin if the stain is not totally removed. Continue the process and after a short time, you should see success. |

|

|

|

|

|
|
|
|
|
Materials |
|
Tools |
|
Assembling Legs & Lower Torso |
|
Attaching the Head |
|
Attaching the Arms |
|
|
|
The GI Joe Collector's Club issued a second head for its exclusive Talking Adventure Team Commander when the flocking on the first head delivered with the figure was not as high quality as desired. The Club issued these instructions for replacing the original head. Remove the two screws from the shoulder. Do not remove the screw from the battery compartment. As you try to separate the figure halves, loosen the screw in the waist at the bottom of the back (don't take it all the way out). As soon as you have enough gap at the top, remove the head and arms. Now slide the hooks off the arms and move the arm clips to the new head's elastic. Hook the arms back (may take a little bit of practice) making sure they are on the correct side of the head (left, right). Separate the torso at the top just enough to drop in the arms, elastic, and head into the slot. Stretch the arms until everything pops into place as you close the torso. Now reinstall the screws and tighten. |
|
|
|
|
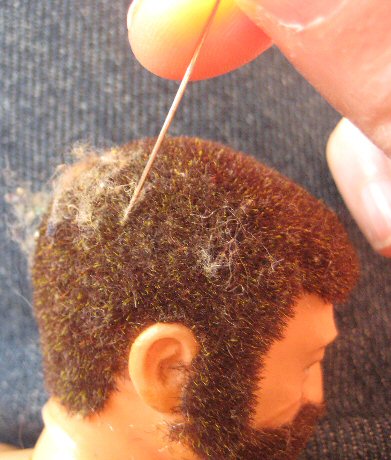
So, you find a decently priced Adventure Team figure and notice that the hair is all full of lint and such. Maybe, you can't even see it or notice anything detracting. However, here's a tip to make the hair look almost like new with just 20 minutes or so of work. Take a pin or needle and use this to remove the debris lurking below that beautiful Life-Like hair. Carefully glide the the tip of the pin into the hair moving in parallel or tangent to the surface of the head. Gently pull up the length of the pin and as you do, you will see that it has grabbed a bunch of stuff - hair, lint, etc. Then either remove this using your fingers or a pair of tweezers (works best). Repeat this process all around the head including the beard. You may have to repeat the process multiple times to get all the debris. It's really amazing how nice the Life-Like hair will look when you are done removing all the junk out of the hair. It almost looks brand new. |
|
|
|
|
I have never tried this technique, but did see on a newsgroup that someone did try it and it was successful. To strip flocked heads, use oven cleaner on the head and leave it sealed in a bag overnight. The hair should come off easily after sitting overnite and any paint should not be damaged. |
|
 The Beachhead © 1998
gi.joeguy1@verizon.net
The Beachhead © 1998
gi.joeguy1@verizon.net
|
|
|

|